A little bench trick for reaching those tiny spots.
Showing posts with label techniques. Show all posts
Showing posts with label techniques. Show all posts


10.22.2011
Riveted Beach Stones!
This morning I had a successful tube riveting session!
Ten stones, all drilled and silver lined. And not one casualty.
I think I am getting good at this!


7.23.2010
Tube Riveting Beach Stones
Adding a sterling tube rivet to a beach stone turns a simple beach find into a treasure you can wear. A soldered jump ring turns the stone into an elegant pendant. Here is how I do it.


First drill the stone

I always drill in cool water using a diamond coated drill bit in a drill press. Let the drill do the work. It takes patience and should not be rushed.


Making a tube rivet
Use dead soft sterling silver tubing that matches the size of the drilled hole, so that the tube just fits into the hole. It needs to be rather snug but not forced.
Using a permanent marker, mark a line where you will cut the tube. Leave about 1/8" or 3mm of silver sticking out on either side of the stone.
Cut using a jeweler's saw. File and sand the ends smooth.


Using a permanent marker, mark a line where you will cut the tube. Leave about 1/8" or 3mm of silver sticking out on either side of the stone.
Cut using a jeweler's saw. File and sand the ends smooth.


Setting the tube rivet
Fit the tube into the hole of the stone and using a small round punch, gently tap one end to flare the top. Turn the piece over and flare the opposite side slightly. Keep alternating sides, using progressively larger dapping punches, then the round side of a chasing hammer to completely flatten the rivet against the stone. Use care not to chip the stone.
Sand the rivet smooth, but do not sand the stone.


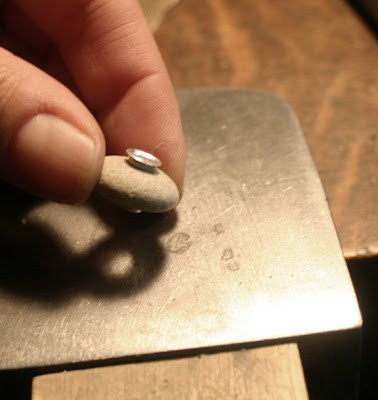


Sand the rivet smooth, but do not sand the stone.


 |
| Sanding smooth. |
Adding jump rings
I like to add large jump rings so the riveted stone hangs nicely on a chain.
Make jump rings by wrapping heavy gauged sterling wire around a steel rod. Use a jeweler's saw to cut rings. Always open jump rings with a twisting motion, never by pulling them apart, which will get the circle out of alignment. Sand the ends of the jump ring smooth. Fit one ring on to each riveted stone and twist back into alignment. Sand smooth and solder closed. Sand, oxidize and polish as desired. Now add a chain or hang from ear wires and you are ready to wear your little reminder of the beach.


Make jump rings by wrapping heavy gauged sterling wire around a steel rod. Use a jeweler's saw to cut rings. Always open jump rings with a twisting motion, never by pulling them apart, which will get the circle out of alignment. Sand the ends of the jump ring smooth. Fit one ring on to each riveted stone and twist back into alignment. Sand smooth and solder closed. Sand, oxidize and polish as desired. Now add a chain or hang from ear wires and you are ready to wear your little reminder of the beach.


6.03.2010
Making a Fossil Necklace

Last week at one of my favorite Lake Erie beaches, I found this really interesting little dark grey beach stone. It must be a fossil of some sort. Look closely and you can see a tiny texture all over it.
UPDATE: I have done some research and this appears to be a "favosite" fossil. Favosite is an older cousin to the Petoskey Stone found only in Northern Michigan. It is a long extinct coral composed of polygonal to slightly rounded shaped tiny marine animals. When our area was closer to the equator, they grew in the shallow tropical waters some 400-385 million years ago. (The Lower Devonian geologic period, for you geology buffs.) The closely adjoined colonies give the formation a honeycomb-like appearance and are somewhat rare. Might also be called a Charlevoix Stone.

 So I decided it needed to be the focus of a new necklace. My studio is kind of dark, so I have difficulty photographing my process, but I thought I'd try to show you a few steps along the way as I made this piece today.
 First I built a bezel using sterling bezel wire and sterling sheet.
 The stone fits!
 I made a jump ring out of heavy gauge wire and soldered it closed. Constructed a bail out of more of the same wire.
 I soldered the bail to the top of the bezel. (Sorry so blurry....too absorbed in my work to dig out the tripod!)
 Filed, sanded, buffed to a satin finish. Almost ready for the stone!
 Once the stone is in place, I used a burnisher to push the bezel against the stone for a firm grip.
 I cut a length of sturdy oxidized silver chain and added my handmade hook clasp and ring.
Soldered, buffed...

Finito!

To see this necklace on Etsy click here.
6.17.2009
My first wax casting


Well, this was very fun! I enrolled in a metalsmithing class and tried my hand at carving a ring from wax. They sent it off to a caster and it came back in sterling silver.
Sorry I didn't bring my camera to class with me or I could have documented the process. Maybe next time!
Of course I had to oxidize it and polish it with the satin buffing wheel. It's just my thang.
I don't plan to sell this ring...but if someone was really interested in having one, I could send it out and get more made. I think it's maybe a size 5 1/2?
Subscribe to:
Posts (Atom)